

In part 3 of his fluid-therapy series, Dr. Palazzolo gives a step-by-step guide for pet owners who choose to administer fluids to an animal with renal disease. It’s not as difficult as you may think.
In this article, we will give you step-by-step instructions in how to give SQ (subcutaneous) fluids at home.
A coat hanger or a hook will be needed to hang the fluid bag. Just make sure it’s higher than where you’re sitting with your pet so that the fluids flow smoothly and rapidly.
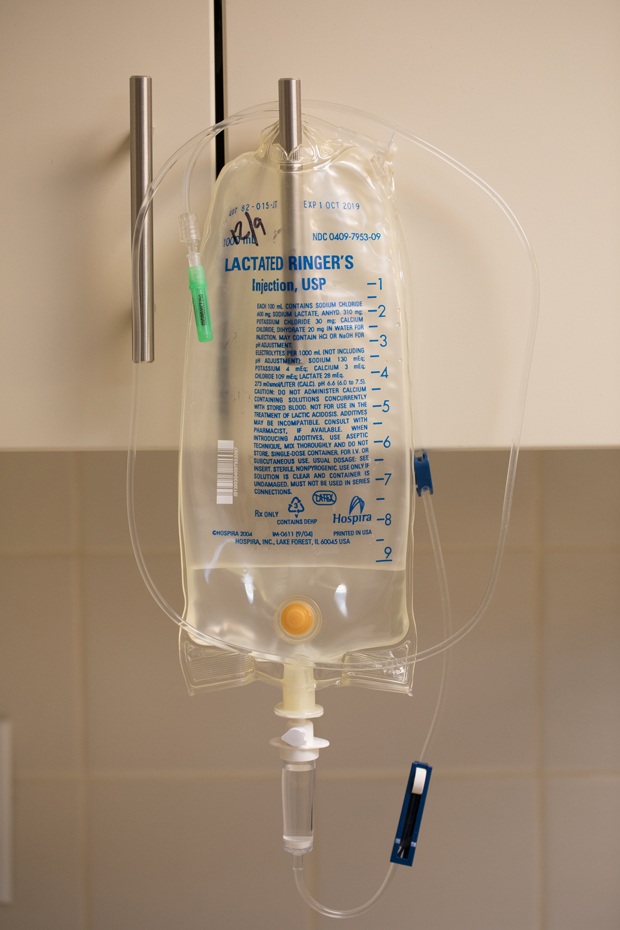
Hang the bag on a coat hanger or from a hook. Keep it at room temperature, and store it away from light, or wrap something around the bag in case additives like vitamins are put into the bag. Squeeze the receptacle until it is filled halfway with fluid from the bag, and then roll the white wheel down until the fluids stop flowing. Photos courtesy of Long Beach Animal Hospital (LBAH).
When you purchase a new bag of sterile fluids, you will also get an IV (intravenous) set and needles. You need to set this up when you get home. It only needs to be set up once when you get the new bag of fluids, and it will take only about a minute once you have experience with it. A typical bag will last for seven to 10 days for the average cat with chronic kidney disease—the most common use for long-term SQ fluids. This might vary depending on many factors that doctors take into consideration when deciding how much to give and how often.

In most cases, you’ll be using lactated ringers solution (LRS). You can read the ingredients on the label. It comes wrapped in a outer package that you remove. The bag is 1 liter (1000ml) in size and is marked in 100ml increments along the right side. Going from the 1 mark to the 2 mark is 100ml, going from the 2 mark to the 3 mark is 100ml, and so on. If you are giving 100ml once daily, it will last for 10 days.
First, open the protective cover on the fluid bag and hang it on your hook or lay it on a flat surface. Open the IV tubing set, and make sure that the white wheel is on the off position. With the fluid bag and IV set bags now open, you are ready to insert the IV line into the fluid bag.

After you remove the outer package of the LRS fluid bag, open the bag that contains the sterile IV tubing.

Be sure that the white wheel is in the off position.
Pull the white plastic tab at the end of the fluid bag, and discard the tab. Remove the white plastic cover at the end of the IV set receptacle and insert this into your bag of fluids. Hang this on your hook if you have not already done so. Squeeze the clear plastic receptacle until it fills half way with fluid from the bag.

Remove plastic tab at the bottom of the fluid bag.

Remove the cover of the IV insertion tube.
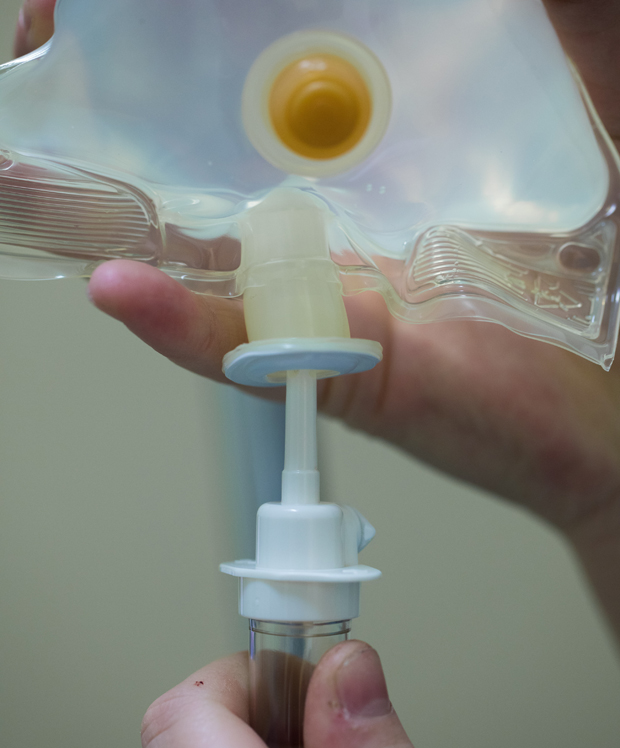
With the fluid bag lying on the ground or hanging, whichever is easier for you, insert the IV tubing all of the way into the bag.
Roll the white wheel up slowly until the fluids start flowing into the receptacle.
The first time you set up your bag, you need to fill the tubing with fluid to remove the air in the IV line. This only needs to be done on a new bag.
Remove the blue cover at the end of the IV tubing, and move the white wheel slightly so that the fluids start flowing. Let them flow for a few seconds until the tubing is completely filled with fluid to remove any air. (If a few air bubbles remain in the tube, it’s not a problem.) Put the blue cover back on the end of the IV tubing. This fluid bag and IV set will not need to be set up again until you get a new bag. All you’ll need to do is change the needle each time you administer fluids. Do not reuse needles because of the potential to induce an infection and also the fact that reuse makes them dull and can cause discomfort upon insertion.

Roll the white wheel down to the end if it is not already in this position. When moved upward, the fluids will start flowing. This opening up of the fluid flow is only done when you are filling the receptacle initially (see below) and later after the needle has been inserted under the skin of your pet so it will get the fluids.
A small bowl is a good receptacle for these fluids, since you will stop the flow after a few drops come out. A small towel can also be used to absorb these few drops of fluids instead of a bowl.
Drape the IV tubing over the hanging fluid bag, and get a needle. Remove the clear end of the back of the needle by twisting it counterclockwise and holding the cover of the needle. Do not touch the open base of the needle to anything since it is sterile. Hold the needle base in your hand.
Remove the blue cover at the other end of the IV set and put it on the table so that you do not contaminate the open end. Push the needle straight onto this open end, and then turn one of your hands clockwise to tighten it.

Your vet should administer the fluids in front of you the first time to see how your pet reacts and to determine how much restraint your pet will need to stay still. They will also show you the amount of fluids to give as prescribed. It’s advised that you do it in front of your vet as many times as it takes for you to feel comfortable with the process.
The key to giving these fluids is to remain calm and to use proper restraint. Some pets will sit on their own; others will require you or an assistant to hold them.
When you’re ready to do this on your own, take a big breath, and get your pet.
Put your pet on the table, pet him or her a few times, take another big breath, and when you have the proper level of restraint, carefully remove the cover on the needle.
As stated, the needle is sterile, so do not touch it to anything. Insert it in the loose skin between the shoulder blades by making a tent with the skin. Unless the vet tells you otherwise, this is the only place to give the fluids.

Hold your pet any way that works for both of you. Pull up the skin between the shoulder blades and rapidly insert the needle. Do not put the needle up against the skin and gently push it in. This will cause more discomfort that actual rapid insertion. The angle demonstrated in the photo is the one to use.
Inserting the needle rapidly is the hardest part of the procedure for most people, so practice on an orange or another soft fruit to get the feel of it.
When you’re ready, use a shallow angle and push it in rapidly. The needle is very sharp and goes in easily. If you put the needle against the skin and then slowly try to push it in, it will cause discomfort and your pet will resist.

Insert the needle all the way in, using one smooth, rapid motion. Hold it there, although for most pets, it stays in by itself while the fluids are flowing.Obviously, this is the most difficult part for most people, and our vets will hold your hands and do it together with you after our demo and when you are ready to do it on your own.
When you are done giving the fluids, stop the flow with the white wheel, pull the needle out, and immediately cap it. That needle is never to be used again and should be discarded. Hold your hand over the spot you gave the fluids for a few seconds to prevent fluids from flowing out of the incision.

Cap the needle when done and remove. Be careful not to jab yourself with it, although we guarantee that you will at least once as you learn.
Hang the tubing on the rack, and put the cap back on the needle. Get a new needle ready, remove the old needle, and put the new needle on, keeping it capped. It is now ready for your next fluid administration.
Give yourself a pat on the back, or get a stiff drink to calm your shaking hands, and then go about your day, confident you have done something that is highly beneficial to your pet.
Our website has a detailed explanation on the use of fluids in animals, including SQ fluids at home. The information is available here.
Your veterinarian will supply the materials you need, and you can also buy them online with a prescription from your doctor.